Oh my goodness, if you’re looking for a dessert that’s guaranteed to bring smiles and cravings, you’ve hit the jackpot with this Peanut Butter Chocolate Ice Cream Cake! Seriously, it’s like a party for your taste buds.
Imagine rich chocolate cake layered with creamy peanut butter and topped with luscious chocolate ice cream, all crowned with fluffy whipped cream and a sweet drizzle of chocolate syrup.
It’s an indulgence that feels like a special occasion, but it’s so easy to whip up that you might find yourself making it just because it’s Tuesday!
Looking for the perfect drink to enjoy with your Peanut Butter Chocolate Ice Cream Cake? Try this Whipped Coffee — frothy, creamy, and the perfect indulgent sip!

I first stumbled upon this magical combination when I was trying to satisfy my sweet tooth one summer afternoon. I had some leftover chocolate cake and peanut butter, and the idea just hit me—why not combine them into one epic dessert? Trust me, the moment I took my first bite, I knew I was onto something incredible! This Peanut Butter Chocolate Ice Cream Cake is an absolute crowd-pleaser at parties, and I can’t wait for you to try it! Let’s get into the nitty-gritty of how to make this delightful treat!
Craving another chocolate treat? Try this Black Velvet Cake — rich, dark, and decadent!
Ingredients for Peanut Butter Chocolate Ice Cream Cake
Now, let’s gather all the deliciousness we need to create this amazing Peanut Butter Chocolate Ice Cream Cake! Here’s what you’ll need:
- 1 chocolate cake mix: Just grab your favorite brand—any will do! This will be the base of our cake.
- 1 cup creamy peanut butter: You can use crunchy if you prefer a little texture, but creamy spreads like a dream!
- 1 pint chocolate ice cream: Make sure it’s soft enough to spread easily. You can also use homemade if you’re feeling adventurous!
- 1 cup whipped cream: This adds a light and fluffy layer to our cake. Store-bought or homemade works perfectly.
- 1/2 cup chocolate syrup: For that decadent drizzle on top—because who doesn’t love a little extra chocolate?
With these ingredients in hand, you’re all set to create something truly special. Trust me, the combination of flavors is just out of this world!
How to Prepare Peanut Butter Chocolate Ice Cream Cake
Alright, let’s dive into the fun part—making this incredible Peanut Butter Chocolate Ice Cream Cake! I promise, each step is simple and oh-so-rewarding. Ready? Let’s go!
Step 1: Prepare the Cake
First things first, you’ll want to prepare the chocolate cake mix. Just follow the instructions on the package—this usually involves mixing the cake mix with water, eggs, and oil. Make sure you mix it until everything is just combined, but don’t overdo it. I like to use a whisk for a smooth batter, but a hand mixer works too. The goal is to achieve a luscious, velvety cake batter that will bake up beautifully!
Step 2: Bake and Cool
Pour that lovely batter into a greased cake pan and pop it into a preheated oven. Bake according to the package directions, typically around 30 minutes, or until a toothpick comes out clean. Once it’s done, let it cool in the pan for about 10 minutes before transferring it to a wire rack. You want the cake to be completely cool before adding the peanut butter, so be patient. I know, it’s tough when that chocolatey aroma fills the air!
Step 3: Spread Peanut Butter
Once your cake is cool, it’s time for the peanut butter magic! Grab your cup of creamy peanut butter and spread it evenly over the top of the cake. I like to use a spatula for this—just make sure you cover every inch! The creamy peanut butter acts like a delicious glue for the next layer, so take your time to make it nice and smooth. It’s like a warm hug for your cake!
Step 4: Layer Ice Cream
Now comes the fun part—layering the chocolate ice cream! Take your pint of chocolate ice cream and let it soften for a few minutes so it’s easier to spread. Once it’s scoopable, dollop it on top of the peanut butter layer. Use a spatula or the back of a spoon to spread it out evenly. You want to make sure every bite has that rich chocolate flavor. Yum!
Step 5: Add Whipped Cream
Next, it’s time to add the whipped cream! Spoon or pipe on a generous layer of whipped cream over the chocolate ice cream. I like to go for a fluffy cloud effect, but you can spread it as thick or thin as you like. This layer adds a lightness that balances out all that rich chocolate and peanut butter. It’s pure bliss!
Step 6: Drizzle Chocolate Syrup
Now, for the grand finale—drizzle that chocolate syrup over the whipped cream! You can get fancy with a squeeze bottle or just drizzle it straight from the bottle. Either way, make sure you cover it generously, because chocolate syrup is life! It adds that decadent touch that makes this cake truly irresistible.
Step 7: Freeze and Serve
Finally, it’s time to freeze your masterpiece. Cover the cake with plastic wrap and pop it in the freezer for at least 2 hours. This will help it set perfectly. When you’re ready to serve, let it sit at room temperature for a few minutes before slicing. This makes cutting much easier, and trust me, you’ll want perfectly clean slices to show off all those delicious layers. Now, dig in and enjoy your creation!
Need a nutty dessert pairing? Try these Pistachio Wedding Cookies — delicate, nutty, and melt-in-your-mouth!
Tips for Success

To make sure your Peanut Butter Chocolate Ice Cream Cake turns out absolutely perfect, I’ve got some pro tips that will elevate your dessert game! Trust me, these little nuggets of wisdom can make all the difference.
- Use Room Temperature Ingredients: Before you start mixing, let your eggs, water, and oil come to room temperature. This helps the cake batter blend more uniformly, resulting in a fluffier cake!
- Let the Cake Cool Completely: It’s crucial to let your cake cool completely before adding the peanut butter and ice cream layers. If it’s even slightly warm, you risk melting the ice cream and messing up those beautiful layers. Patience is key here!
- Spread with Care: When spreading the peanut butter and ice cream, take your time to ensure even coverage. This not only looks great but guarantees every bite is packed with flavor!
- Freezing is Important: Don’t skip the freezing step! This helps the layers set and makes slicing so much easier when it’s time to serve. Plus, it gives the flavors a chance to meld together beautifully.
- Use a Warm Knife for Slicing: For clean slices, dip your knife in warm water, then wipe it dry before cutting into the cake. It’ll glide through the layers like a dream, making your cake look even more impressive.
With these tips in your back pocket, you’re all set to create a stunning dessert that will wow everyone at the table. Happy baking!
Nutritional Information
Alright, let’s talk numbers! While we all know that dessert is about indulgence, it’s nice to have an idea of what we’re diving into, right? Here’s the estimated nutritional breakdown for each slice of this scrumptious Peanut Butter Chocolate Ice Cream Cake:
- Calories: 350
- Fat: 18g
- Saturated Fat: 8g
- Unsaturated Fat: 8g
- Trans Fat: 0g
- Cholesterol: 30mg
- Sodium: 200mg
- Carbohydrates: 40g
- Fiber: 2g
- Sugar: 25g
- Protein: 6g
Keep in mind that these values are estimates and can vary based on specific brands and ingredients you use. But hey, when it comes to dessert, it’s all about enjoying every rich, creamy, and delicious bite, right? Now, let’s get back to the fun part—eating!
Love brownies with peanut butter vibes? Try these Coffee Caramel Swirl Brownies — fudgy, bold, and indulgent!
Print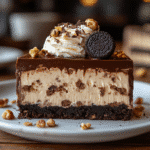
Peanut Butter Chocolate Ice Cream Cake: 7 Indulgent Layers of Joy
- Total Time: 2 hours 50 minutes
- Yield: 12 servings 1x
- Diet: Vegetarian
Description
A delicious dessert combining chocolate cake, peanut butter, and ice cream.
Ingredients
- 1 chocolate cake mix
- 1 cup peanut butter
- 1 pint chocolate ice cream
- 1 cup whipped cream
- 1/2 cup chocolate syrup
Instructions
- Prepare the chocolate cake mix according to package instructions.
- Bake the cake and let it cool.
- Spread peanut butter on top of the cooled cake.
- Layer chocolate ice cream over the peanut butter.
- Top with whipped cream.
- Drizzle chocolate syrup over the whipped cream.
- Freeze for at least 2 hours before serving.
Notes
- Use creamy or crunchy peanut butter based on preference.
- Let the cake sit at room temperature for a few minutes before slicing.
- Prep Time: 20 minutes
- Cook Time: 30 minutes
- Category: Dessert
- Method: Baking
- Cuisine: American
Nutrition
- Serving Size: 1 slice
- Calories: 350
- Sugar: 25g
- Sodium: 200mg
- Fat: 18g
- Saturated Fat: 8g
- Unsaturated Fat: 8g
- Trans Fat: 0g
- Carbohydrates: 40g
- Fiber: 2g
- Protein: 6g
- Cholesterol: 30mg
Keywords: Peanut Butter Chocolate Ice Cream Cake
FAQ About Peanut Butter Chocolate Ice Cream Cake
Got questions about this delightful Peanut Butter Chocolate Ice Cream Cake? Don’t worry, I’ve got you covered! Here are some common queries I get, along with my best answers to help you create the perfect dessert:
Can I use homemade chocolate cake instead of a mix?
Absolutely! If you’ve got a favorite chocolate cake recipe, feel free to use it. Just make sure it’s baked and cooled completely before adding the layers.
What if I don’t have chocolate syrup?
No problem! You can substitute it with caramel sauce or even a homemade chocolate ganache. Just make sure it’s pourable for that perfect drizzle!
Can I make this cake a day in advance?
Yes! In fact, making it a day ahead can enhance the flavors as they meld together. Just keep it covered in the freezer until you’re ready to serve.
What if I’m not a fan of peanut butter?
Try using almond butter or sunbutter instead! They’ll give you a similar creamy texture and nutty flavor without the peanut butter taste. Feel free to experiment!
How do I store leftovers?
Keep any leftovers tightly covered in the freezer. Just remember to let it sit at room temperature for a few minutes before slicing, so you get those lovely, clean cuts!
Can I add toppings or mix-ins?
Yes! Feel free to get creative. Chopped nuts, sprinkles, or even crushed cookies on top can add an extra layer of fun and flavor. The world is your oyster!
Is this cake suitable for a gluten-free diet?
If you use a gluten-free chocolate cake mix, then yes! Just double-check the ice cream and other ingredients to ensure they’re gluten-free as well.
How long does the cake last in the freezer?
This cake can last in the freezer for up to a month! Just make sure it’s well-wrapped to prevent freezer burn. But let’s be honest, it probably won’t last that long!
I hope these FAQs help you on your way to making the best Peanut Butter Chocolate Ice Cream Cake ever! If you have any more questions, don’t hesitate to ask. Happy baking!
Why You’ll Love This Recipe
- Easy Preparation: This Peanut Butter Chocolate Ice Cream Cake comes together quickly with simple ingredients, making it a breeze to whip up even on busy days!
- Delicious Flavor Combination: The rich chocolate cake paired with creamy peanut butter and chocolate ice cream creates a flavor explosion that’s hard to resist!
- Crowd-Pleasing Dessert: Whether it’s a birthday party, family gathering, or just a casual get-together, this cake is sure to impress and satisfy everyone’s sweet tooth.
- Make-Ahead Option: You can prepare this cake in advance and freeze it, making it a perfect dessert for entertaining without the last-minute rush!
- Customizable: Feel free to add your favorite toppings or mix-ins, like sprinkles or crushed cookies, to make it uniquely yours!
- Fun for All Ages: Kids and adults alike will love digging into this deliciously layered cake—it’s a hit with everyone!
Storage & Reheating Instructions
Now that you’ve whipped up this delightful Peanut Butter Chocolate Ice Cream Cake, let’s talk about how to store those scrumptious leftovers! First things first, if you happen to have any slices left (which is always a possibility, but hey, I’m just saying!), you’ll want to keep them in the freezer for the best flavor and texture.
To store, wrap any leftover cake slices tightly in plastic wrap or place them in an airtight container. This helps prevent freezer burn and keeps that delicious taste intact. The cake can last in the freezer for up to a month. But let’s be honest—once you share this beauty, it might not last that long!
When you’re ready to enjoy a slice (or two!), just take it out of the freezer and let it sit at room temperature for about 10-15 minutes. This will make it easier to slice and help bring back that soft, creamy texture. You’ll want to be careful though—cutting straight from the freezer can be a bit challenging! So, a little patience goes a long way.
If you have any leftover whipped cream or toppings, store those separately in the fridge and add them just before serving for the freshest taste. And remember, there’s no need to reheat this cake; it’s meant to be enjoyed cold, with all those layers of ice cream and creamy goodness. Now, go ahead and savor every last bite!
Want another frozen-inspired delight? Try this Strawberry Pina Colada Smoothie — creamy, tropical, and refreshing!
For daily recipes you can follow me on Facebook and Pinterest.