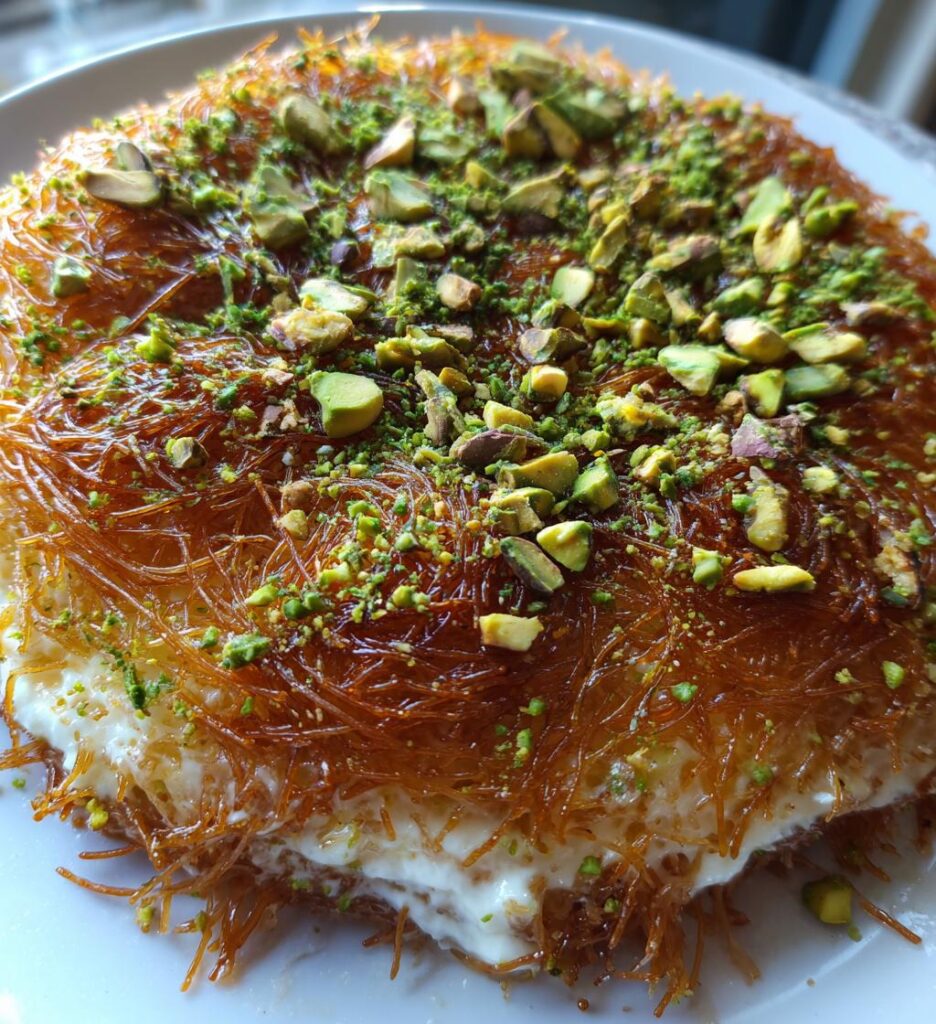
Oh my goodness, let me tell you about Kunafa Cake! This dessert is a showstopper that’s sure to impress anyone who takes a bite. Imagine layers of thin, crispy pastry soaking up a sweet syrup, all while being filled with gooey, melty cheese. It’s a beautiful blend of textures and flavors that’s simply irresistible. Whenever I make it, I can’t help but be transported back to those warm Middle Eastern evenings filled with laughter, family, and, of course, incredible food. Trust me, once you try this recipe, you’ll want to share it with everyone you know!
Looking for another nutty dessert to enjoy with your Kunafa Cake? Try these Baklava Bites — crispy, flaky, and filled with honeyed nuts!

Ingredients List
Gathering the right ingredients is the first step to creating the perfect Kunafa Cake. Here’s what you’ll need:
- 500g kunafa pastry: This is the star of the show! Look for it in the frozen section of your local grocery store. It’s thin, noodle-like strands that create that wonderful texture.
- 250g unsalted butter, melted: Butter is essential for giving the kunafa its rich flavor and crispiness. Make sure it’s completely melted for easy mixing!
- 300g mozzarella cheese: I love using mozzarella because it melts beautifully and gives that gooey, stretchy texture we crave in a great dessert.
- 200g ricotta cheese: This adds a lovely creaminess to the filling. If you can, go for fresh ricotta; it really makes a difference!
- 200g sugar: This is what sweetens our syrup. You can adjust the amount slightly if you prefer a less sweet cake; just keep in mind it needs some sweetness to balance the flavors!
- 300ml water: This is used to make the syrup, which soaks into the kunafa and makes it irresistibly moist.
- 1 tsp vanilla extract: A little splash of vanilla elevates the flavors and adds a warm, aromatic touch to the syrup.
- 100g pistachios, chopped: These are for garnishing and add a delightful crunch and beautiful color contrast to our cake.
Now that you have the ingredients ready, let’s get cooking!
Craving a creamy twist? Try this Baklava Cheesecake — rich, luscious, and layered with phyllo crunch!
How to Prepare Kunafa Cake
Now that we’ve got our ingredients ready, let’s dive into the fun part—making this delectable Kunafa Cake! Follow these steps, and you’ll be on your way to dessert perfection.
Preheat the Oven
First things first, you’ll want to preheat your oven to 180°C (350°F). Preheating is super important because it ensures that your cake bakes evenly, giving it that gorgeous golden-brown color and perfect texture. Trust me, you don’t want to skip this step!
Prepare the Syrup
While the oven warms up, let’s make the syrup. In a saucepan, combine 200g sugar, 300ml water, and 1 tsp vanilla extract. Bring it to a boil over medium heat. Once it starts boiling, reduce the heat and let it simmer for about 10 minutes, or until it thickens slightly. You want it to be syrupy but not too thick; it should have a pourable consistency. Set it aside to cool a bit—this will be drizzled over our warm cake later!
Combine Kunafa Pastry and Butter
Now, let’s mix the star of our cake! In a large bowl, take the 500g kunafa pastry and add in the 250g melted unsalted butter. Use your hands to gently separate and mix the kunafa strands with the butter until they’re well coated. You’re looking for a slightly crumbly texture that holds together when squeezed. This step is crucial for achieving that crispy, buttery goodness!
Layering the Ingredients
Time to layer it all up! Start by spreading half of the kunafa mixture evenly in the bottom of a baking dish, pressing it down gently. Next, sprinkle the 300g mozzarella cheese and 200g ricotta cheese over the kunafa layer. Make sure to cover it well; we want that cheesy deliciousness in every bite! After that, add the remaining kunafa mixture on top, pressing it down lightly again. It’s like building a cozy cheese-filled pastry sandwich!
Baking the Cake
Pop your layered masterpiece into the preheated oven and bake for about 30-35 minutes. Keep an eye on it during the last few minutes; you want it to be beautifully golden brown on top. A good trick to check for doneness is to gently shake the pan—if it jiggles just a little in the center, it’s ready!
Adding the Syrup
Once your cake is out of the oven, it’s time for the sweet finishing touch! While the cake is still hot, pour the cooled syrup generously over the top. The warmth of the cake will help the syrup soak in, making every bite extra indulgent. Let it sit for a few minutes so the syrup can really do its magic!
Garnishing
Finally, let’s make it pretty! Sprinkle 100g chopped pistachios over the top for that lovely crunch and a pop of color. You can be as generous as you like—pistachios not only look beautiful but add a delightful nutty flavor that complements the sweetness of the cake. And there you have it, your Kunafa Cake is ready to be enjoyed!
Need an elegant treat? Try these Baklava Cream Sandwich Cookies — bite-sized delights with nutty cream filling!
Why You’ll Love This Recipe
Let me tell you, this Kunafa Cake is more than just a dessert—it’s an experience! Here’s why you’re going to absolutely adore this recipe:
- Easy to Make: Seriously, if I can whip this up, so can you! The steps are straightforward, and you don’t need any fancy equipment.
- Deliciously Rich: The combination of buttery kunafa, gooey cheese, and sweet syrup creates a flavor explosion in every bite. It’s a sweet tooth’s dream come true!
- Perfect for Gatherings: This cake is a showstopper! Whether it’s a family dinner or a festive celebration, it’s sure to impress your guests and leave them asking for seconds.
- Versatile: You can easily customize it with different toppings or cheeses, making it adaptable to your taste. Feeling adventurous? Experiment with flavors!
- Make Ahead Option: I love that you can prepare it in advance and simply reheat before serving, making it stress-free for entertaining.
Trust me, once you taste this Kunafa Cake, you’ll be hooked—and your friends and family will be begging for your secret recipe!
Tips for Success
Getting that perfect Kunafa Cake takes a little love and attention, but I’ve got some tried-and-true tips to help you nail it every time! Here’s what I’ve learned over the years:
- Use Fresh Ingredients: Always opt for fresh cheese and kunafa pastry. It makes a world of difference in texture and flavor! Frozen kunafa works great, but try to use it soon after thawing for the best results.
- Don’t Rush the Syrup: When you’re making the syrup, it’s tempting to hurry through it, but let it simmer until it thickens slightly. This ensures it’ll soak into the cake nicely without making it soggy.
- Check the Oven Temperature: Ovens can be tricky! If you find your cake is browning too quickly, reduce the temperature a bit. Conversely, if it’s not browning, you might need to crank it up just a tad.
- Press Firmly: When layering the kunafa in the baking dish, be sure to press down firmly but gently. This helps it hold together while baking and adds to that delightful crispy texture!
- Let It Rest: After pouring the syrup over the hot cake, allow it to sit for at least 10 minutes before cutting. This helps the syrup soak in evenly, enhancing every slice.
- Experiment with Toppings: Feel free to get creative with your garnishes! While pistachios are traditional, try adding almonds, walnuts, or even a sprinkle of cinnamon for a unique twist.
- Practice Makes Perfect: Don’t worry if it’s not perfect the first time! Each time you make it, you’ll learn something new and get closer to your ideal Kunafa Cake.
With these tips in your back pocket, you’re set to create a Kunafa Cake that’s sure to impress everyone around your table. Happy baking!
Love nutty cakes? Try this Greek Honey Cake — moist, fragrant, and naturally sweetened with honey!
Variations
While the classic Kunafa Cake is absolutely divine as is, there’s always room to shake things up a bit! Here are some fun variations to consider that can add your personal touch to this delightful dessert:
- Cheese Blend: Experiment with different cheese combinations! Instead of just mozzarella and ricotta, you could add a bit of cream cheese for extra richness or swap mozzarella for a sharper cheese like feta for a unique twist.
- Nutty Goodness: While pistachios are a favorite, try using a mix of nuts like almonds, walnuts, or even hazelnuts. You can chop them finely or leave them in larger pieces for added crunch!
- Flavor Infusions: Add some zest to your syrup! Consider infusing it with citrus peels like lemon or orange for a bright, fresh flavor. A sprinkle of cardamom or cinnamon in the cheese layer can also bring a lovely warmth to the cake.
- Fruit Additions: For a fruity twist, layer in some fresh or dried fruits like figs, dates, or even a handful of berries. They can add a delightful sweetness and a pop of flavor that complements the richness of the cheese.
- Chocolate Drizzle: If you’re a chocolate lover, drizzle some melted chocolate over the top after garnishing with nuts. It adds a decadent touch that’s hard to resist!
- Vegan Version: For a plant-based option, look for vegan cheeses that melt well and use coconut oil in place of butter. You could also make a simple syrup using agave or maple syrup to keep it vegan-friendly!
Feel free to mix and match these ideas to create your very own signature Kunafa Cake. The possibilities are endless, and I can’t wait for you to get creative with it!
Storage & Reheating Instructions
Got leftovers? Don’t worry, this Kunafa Cake stores beautifully! Here’s how to keep it fresh and tasty for days to come:
- Storing: Once your Kunafa Cake has cooled completely, cover it tightly with plastic wrap or transfer it to an airtight container. It’ll keep in the refrigerator for up to 3 days. If you’re like me and can’t help but snack on it, you might want to hide it in the back of the fridge!
- Freezing: If you want to save some for later, you can freeze it! Just wrap individual slices tightly in plastic wrap and then in aluminum foil to prevent freezer burn. It’ll stay good for about a month. When you’re ready to indulge again, just thaw it in the fridge overnight.
Now, for the best part—reheating! I recommend reheating in the oven for that glorious crispy texture:
- Oven Method: Preheat your oven to 180°C (350°F). Place the slice on a baking sheet and cover it lightly with aluminum foil to prevent it from browning too much. Heat for about 10-15 minutes, or until warmed through. The edges should crisp up nicely, bringing back that delightful crunch!
- Microwave Method: If you’re in a hurry, the microwave can do the trick, but keep in mind it won’t have the same crispy texture. Just pop a slice on a microwave-safe plate, cover it with a damp paper towel, and heat for about 30-45 seconds, or until warmed to your liking.
And there you have it! Now you can enjoy your Kunafa Cake any time, even as leftovers. Trust me, it’s just as delicious the next day—if it lasts that long!
Nutritional Information
Now, let’s talk about the nutritional side of things! This Kunafa Cake is a delightful treat, but it’s always good to know what you’re indulging in. Here’s a breakdown of the typical nutritional values per serving (1 slice):
- Calories: 350
- Fat: 20g
- Saturated Fat: 10g
- Unsaturated Fat: 8g
- Trans Fat: 0g
- Cholesterol: 50mg
- Sodium: 200mg
- Carbohydrates: 35g
- Fiber: 2g
- Sugar: 25g
- Protein: 8g
Keep in mind that these values are estimates and can vary based on the specific ingredients you use. Enjoying a slice of Kunafa Cake is definitely a treat, so savor every bite! Whether you’re celebrating or just satisfying a sweet craving, it’s worth every calorie.
Print
Kunafa Cake: 7 Comforting Layers of Sweet Nostalgia
- Total Time: 1 hour 5 minutes
- Yield: 8 servings 1x
- Diet: Vegetarian
Description
Kunafa Cake is a delicious dessert made from thin noodle-like pastry soaked in syrup, layered with cheese and topped with nuts.
Ingredients
- 500g kunafa pastry
- 250g unsalted butter, melted
- 300g mozzarella cheese
- 200g ricotta cheese
- 200g sugar
- 300ml water
- 1 tsp vanilla extract
- 100g pistachios, chopped
Instructions
- Preheat the oven to 180°C (350°F).
- In a saucepan, combine sugar, water, and vanilla. Boil until syrup thickens.
- Mix melted butter with kunafa pastry in a bowl.
- Spread half of the kunafa mixture in a baking dish.
- Layer mozzarella and ricotta cheese on top.
- Add the remaining kunafa mixture over the cheese.
- Bake for 30-35 minutes until golden brown.
- Pour syrup over the hot kunafa cake.
- Garnish with chopped pistachios before serving.
Notes
- Use fresh cheese for the best texture.
- Let the syrup cool before pouring it on the cake.
- Serve warm or at room temperature.
- Prep Time: 30 minutes
- Cook Time: 35 minutes
- Category: Dessert
- Method: Baking
- Cuisine: Middle Eastern
Nutrition
- Serving Size: 1 slice
- Calories: 350
- Sugar: 25g
- Sodium: 200mg
- Fat: 20g
- Saturated Fat: 10g
- Unsaturated Fat: 8g
- Trans Fat: 0g
- Carbohydrates: 35g
- Fiber: 2g
- Protein: 8g
- Cholesterol: 50mg
Keywords: Kunafa Cake, Middle Eastern dessert, cheese dessert
FAQ Section
What is Kunafa Cake?
Kunafa Cake is a delicious Middle Eastern dessert made with thin noodle-like pastry layers soaked in sweet syrup and filled with a wonderful blend of cheeses. It’s a festive favorite that’s loved for its unique texture and rich flavors!
Can I use different cheeses for Kunafa Cake?
Absolutely! While I love the combination of mozzarella and ricotta, you can experiment with other cheeses too. Cream cheese adds extra richness, and feta can give a nice tangy flavor. Just make sure to choose cheeses that melt well for that gooey texture!
Can I make Kunafa Cake ahead of time?
Yes, you can! This cake actually tastes great when made in advance. Just prepare the cake, let it cool, and store it in the fridge. When you’re ready to serve, reheat it in the oven for that crispy texture and then pour on the syrup!
What’s the best way to serve Kunafa Cake?
Kunafa Cake is best served warm or at room temperature. I love garnishing it with chopped pistachios for that extra crunch and a touch of color. You can also add a dollop of whipped cream or a scoop of vanilla ice cream for a delightful twist!
How do I store leftovers?
To keep your Kunafa Cake fresh, cover it tightly with plastic wrap or transfer it to an airtight container. It’ll stay good in the fridge for up to 3 days. If you want to save it for longer, you can freeze individual slices wrapped tightly for up to a month!
Want another Middle Eastern–inspired pastry? Try these Delicious Baklava Rolls — crunchy, syrupy, and irresistible!
For daily recipes you can follow me on Facebook and Pinterest.