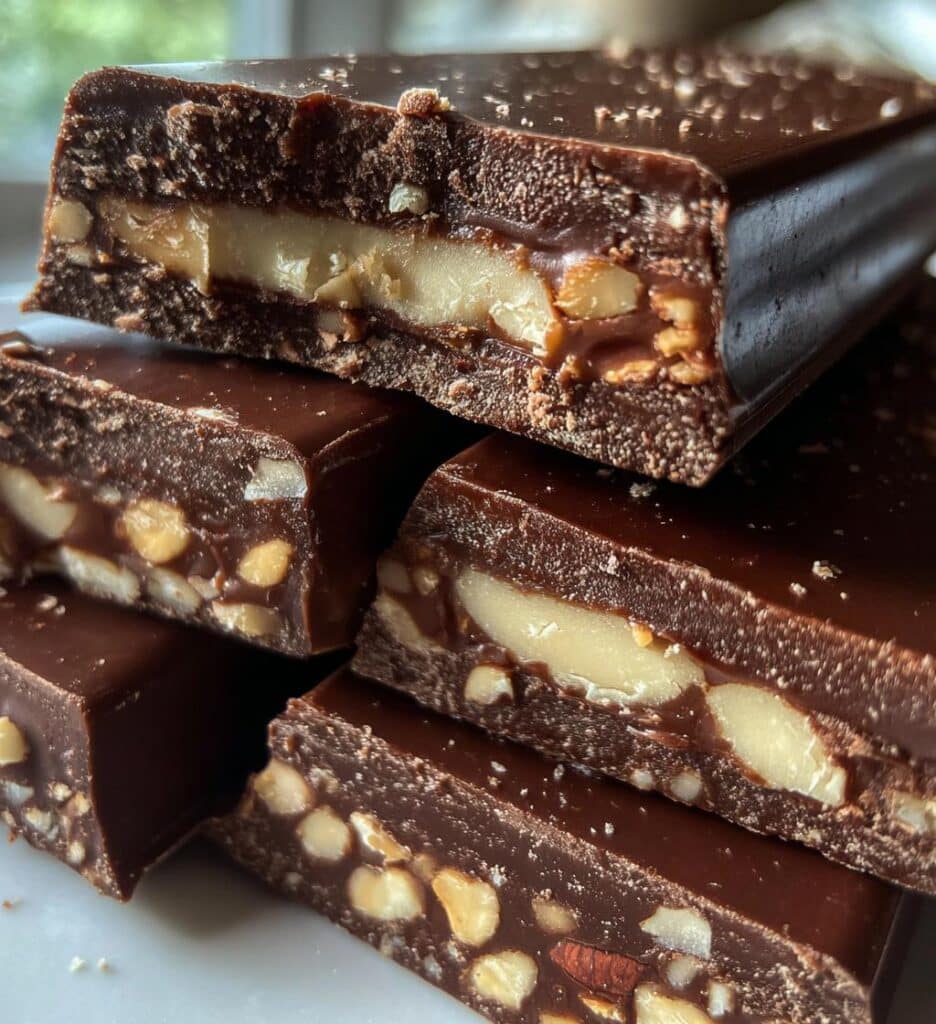
There’s something absolutely magical about making your own candy bars at home. Picture this: rich, creamy chocolate melding with a sweet filling that you crafted with your own two hands. Not only do you get to control the ingredients, but you also get to customize every bite to your liking! Trust me, once you experience the satisfaction of cutting into a freshly made batch of homemade chocolate candy bars, you’ll never look at store-bought treats the same way again. This recipe is so simple and rewarding, you won’t believe how quickly you can whip up a batch. Plus, they make for the perfect sweet treat to share with friends or keep all to yourself (no judgment here!). So, roll up your sleeves and let’s dive into the delicious world of homemade chocolate candy bars!
Ingredients for Homemade Chocolate Candy Bars
To create these delightful homemade chocolate candy bars, you’ll need just a handful of simple ingredients that come together to make something truly special. Here’s what you’ll need:
- 1 cup dark chocolate chips – This is where the magic begins! Choose good-quality dark chocolate for that rich flavor.
- 1/2 cup sweetened condensed milk – This creamy goodness adds the perfect sweetness and helps bind everything together.
- 1/4 cup unsweetened cocoa powder – For that deep chocolate flavor, this adds a nice balance to the sweetness.
- 1/2 cup crushed nuts – Feel free to use your favorite nuts! They add a lovely crunch and extra richness.
- 1 teaspoon vanilla extract – A splash of vanilla elevates the flavor and makes everything taste even more delicious.
These ingredients come together to create a treat that’s not just tasty but also incredibly satisfying to make! Don’t worry if you don’t have everything on hand; you can always get creative with substitutions or additions!
How to Prepare Homemade Chocolate Candy Bars
Making these homemade chocolate candy bars is a breeze, and I can’t wait to walk you through the process! Just follow these simple steps, and you’ll have a batch of delicious bars ready to enjoy in no time.
Step-by-Step Instructions
- Melt the Chocolate: Start by melting your dark chocolate chips. I like to use a microwave-safe bowl for this, zapping them in 30-second increments. Stir between each interval until it’s smooth and glossy. It usually takes about 1-2 minutes total. Just be careful not to overheat it – burnt chocolate is a real bummer!
- Mix the Filling: While your chocolate is melting, grab another bowl and mix together the sweetened condensed milk, unsweetened cocoa powder, crushed nuts, and vanilla extract. The combination of these ingredients creates a wonderfully creamy filling. Make sure to mix it thoroughly so that everything is evenly incorporated!
- Combine: Once your chocolate is melted and your filling is ready, pour the melted chocolate right into the bowl with the filling mixture. Stir it all together until it’s well combined – you want every bit of that chocolate goodness mixed in. It should have a luscious, thick consistency.
- Pour and Spread: Line a baking dish (an 8×8 inch works great) with parchment paper for easy removal. Pour the chocolate mixture into the dish, spreading it out evenly. Use a spatula to smooth the top, making sure there are no air bubbles. This is where the magic happens, so get it nice and even!
- Refrigerate: Now, here comes the hardest part – waiting! Pop the dish in the refrigerator and let it chill for at least 2 hours, or until it’s set. This step is crucial because it helps the bars hold their shape when you cut into them. I usually take this time to clean up my kitchen, so I don’t feel guilty about indulging later!
- Cut and Serve: Once set, take the dish out of the fridge and carefully lift the bars out using the parchment paper. Place them on a cutting board and cut them into your desired size. I like to make them about 2 inches long – perfect for a sweet snack! Serve and enjoy, or store them in an airtight container in the fridge for later!
And there you have it! Homemade chocolate candy bars that are simple, satisfying, and oh-so-delicious. You’ll be amazed at how quickly they come together and how much better they taste than anything you can buy at the store!
Why You’ll Love This Recipe
- Quick and Easy: With just a few simple steps, you can whip up these delicious candy bars in no time!
- Irresistible Flavor: The combination of dark chocolate and creamy filling creates a flavor explosion that will have you coming back for more!
- Customizable: Feel free to play around with different nuts, or even add in your favorite flavors like sea salt or caramel!
- No-Bake Delight: No oven required! Just melt, mix, and chill – it’s perfect for hot days when you want something sweet without heating up the kitchen.
- Homemade Happiness: There’s something truly special about making your own treats. You’ll feel such a sense of accomplishment when you take that first bite!
- Perfect for Sharing: These bars make a fantastic gift or a sweet addition to any gathering. Trust me, everyone will be impressed!
Tips for Success with Homemade Chocolate Candy Bars
Before you dive into making these delicious homemade chocolate candy bars, let me share some of my best tips to ensure your bars turn out perfect every time!
- Melting Chocolate: When melting chocolate, patience is key! Always melt in short intervals, about 30 seconds at a time, stirring in between. This helps prevent overheating, which can lead to that dreaded burnt chocolate. If you notice it starting to seize, adding a tiny bit of coconut oil can help bring it back to life!
- Mix Thoroughly: When combining the filling ingredients, make sure to mix them well. You want that sweetened condensed milk and cocoa powder to be fully incorporated for a smooth, creamy filling. If you’re feeling fancy, a hand mixer can help whip it into a fluffier consistency!
- Choose Your Nuts Wisely: The type of nuts you use can really change the game! I love using a mix of almonds and walnuts for that perfect crunch. Just make sure they’re finely crushed, so they blend into the filling nicely.
- Chilling Time: Don’t rush the chilling process! Allowing the bars to set in the refrigerator for at least 2 hours is crucial to achieving the right texture. If you have the time, letting them chill overnight makes them even firmer and easier to cut!
- Storage Tips: These candy bars are best stored in an airtight container in the fridge. They can last up to a week, but trust me, they likely won’t last that long! If you want to keep them longer, you can freeze them. Just wrap each bar in plastic wrap and place them in a freezer bag. They’ll stay delicious for up to 2 months!
- Get Creative: Don’t be afraid to experiment! Add in some dried fruits, a sprinkle of sea salt, or even a drizzle of caramel on top before they set. The world is your oyster when it comes to customizing these bars!
With these tips in your back pocket, you’re all set for chocolate candy bar success. Happy candy-making!
Variations on Homemade Chocolate Candy Bars

One of the best parts about making your own homemade chocolate candy bars is the endless possibilities for creativity! You can easily switch things up to match your cravings or the season. Here are some fun variations to try:
- Peanut Butter Delight: Swirl in some creamy or crunchy peanut butter into the filling for a classic flavor combo that’s hard to resist! Learn more about peanut caramel filling here.
- Mint Chocolate: Add a few drops of peppermint extract to the chocolate mixture for a refreshing minty twist that’s perfect for the holidays.
- Chocolate Coconut: Mix in shredded coconut to the filling for a tropical flair, or sprinkle some on top before chilling for added texture.
- Fruit and Nut Fusion: Incorporate dried fruits like cranberries or apricots along with your choice of nuts for a chewy, fruity surprise in every bite!
- Spicy Kick: Add a pinch of cayenne pepper or chili powder to the chocolate for a surprising and delightful spicy kick that balances the sweetness.
- Cookie Dough Surprise: Fold in small pieces of edible cookie dough into the filling for a fun, nostalgic treat that combines two favorites!
Feel free to mix and match these ideas or come up with your own! The beauty of homemade treats is that you can tailor them exactly to your taste. So, get adventurous and have fun experimenting with flavors and fillings!
Nutritional Information for Homemade Chocolate Candy Bars
When it comes to enjoying homemade chocolate candy bars, it’s always good to know what you’re indulging in! Keep in mind that nutritional values can vary based on the specific ingredients and brands you choose, but here are some typical values per bar to give you a general idea:
- Calories: 150
- Sugar: 12g
- Sodium: 20mg
- Fat: 9g
- Saturated Fat: 4g
- Unsaturated Fat: 3g
- Trans Fat: 0g
- Carbohydrates: 15g
- Fiber: 2g
- Protein: 3g
- Cholesterol: 5mg
These figures provide a reasonable estimate, but always feel free to adjust ingredients based on your dietary needs and preferences. Enjoy your delicious homemade treats while being aware of what you’re savoring!
FAQ About Homemade Chocolate Candy Bars
As you embark on your journey to make these delightful homemade chocolate candy bars, you might have a few questions. Don’t worry! I’ve gathered some common queries to help you along the way:
Can I substitute the dark chocolate chips?
Absolutely! If you prefer milk chocolate or even white chocolate, feel free to swap it out. Just keep in mind that the sweetness will vary, so adjust the sweetened condensed milk accordingly!
How should I store the candy bars?
Store your homemade chocolate candy bars in an airtight container in the fridge. They’ll stay fresh for about a week, but trust me, they won’t last that long! You can also freeze them for up to 2 months—just make sure to wrap them well!
Can I use other types of nuts or add extras?
Definitely! You can use any nuts you love, like pecans, hazelnuts, or even sunflower seeds for a nut-free version. Plus, feel free to add extras like dried fruits, seeds, or even a sprinkle of sea salt on top for that extra flair!
What if my chocolate seizes while melting?
Oops! If that happens, don’t panic. You can usually rescue it by adding a small amount of coconut oil or vegetable oil and stirring until it smooths out. Just remember to melt slowly and stir often to prevent it in the first place!
Can I make these candy bars vegan?
Yes! To make these candy bars vegan, simply substitute the sweetened condensed milk with a plant-based alternative, like coconut cream or a vegan sweetened condensed milk option. And, of course, ensure your chocolate is dairy-free!
I hope these FAQs help clear up any questions you might have! Enjoy the process and happy candy-making!
Serving Suggestions for Homemade Chocolate Candy Bars
Now that you’ve made these delicious homemade chocolate candy bars, you’ll want to enjoy them to the fullest! Here are some delightful serving suggestions that will elevate your treat experience:
- With a Cup of Coffee: Pair your candy bars with a warm cup of coffee for the perfect afternoon pick-me-up! The rich chocolate flavor complements the coffee beautifully.
- Over Ice Cream: Crumble a bar over a scoop of vanilla or chocolate ice cream. It’s like a sundae with a twist, and the contrast of temperatures is simply divine!
- Fresh Fruit: Serve alongside fresh berries or sliced bananas. The natural sweetness of the fruit balances out the richness of the chocolate, creating a refreshing combination.
- With Whipped Cream: Top with a dollop of freshly whipped cream for an indulgent dessert. You can even add a sprinkle of cocoa powder or nuts on top for a little extra flair!
- As a Snack: These bars make for a fantastic on-the-go snack! Wrap them up for a quick treat during your busy day or pack them in lunchboxes for a sweet surprise.
No matter how you choose to enjoy them, these homemade chocolate candy bars are sure to satisfy your sweet tooth and impress your friends and family. So go ahead, get creative with your pairings, and indulge in the deliciousness!
Print
Homemade Chocolate Candy Bars: 5 Comforting Steps to Joy
- Total Time: 2 hours 25 minutes
- Yield: 12 bars 1x
- Diet: Vegetarian
Description
Delicious homemade chocolate candy bars with a creamy filling.
Ingredients
- 1 cup dark chocolate chips
- 1/2 cup sweetened condensed milk
- 1/4 cup unsweetened cocoa powder
- 1/2 cup crushed nuts
- 1 teaspoon vanilla extract
Instructions
- Melt the dark chocolate chips in a microwave-safe bowl.
- In another bowl, mix sweetened condensed milk, cocoa powder, crushed nuts, and vanilla extract.
- Combine the melted chocolate with the mixture and stir well.
- Pour the mixture into a lined baking dish.
- Refrigerate for at least 2 hours until set.
- Cut into bars and serve.
Notes
- Use any nuts of your choice.
- Store in an airtight container in the fridge.
- Add toppings like sea salt for extra flavor.
- Prep Time: 15 minutes
- Cook Time: 10 minutes
- Category: Dessert
- Method: No-bake
- Cuisine: American
Nutrition
- Serving Size: 1 bar
- Calories: 150
- Sugar: 12g
- Sodium: 20mg
- Fat: 9g
- Saturated Fat: 4g
- Unsaturated Fat: 3g
- Trans Fat: 0g
- Carbohydrates: 15g
- Fiber: 2g
- Protein: 3g
- Cholesterol: 5mg
Keywords: Homemade Chocolate Candy Bars