In recent years, more home cooks have rediscovered the joy of making fresh, warm, crusty bread right from their kitchen—without spending hours kneading or watching dough rise. That’s where the bread machine recipe revolution comes in. Whether you’re looking to make classic white bread, whole wheat, or something a little more gourmet like rosemary focaccia or cinnamon swirl, a bread machine can handle it all with little effort on your part.
In this ultimate guide, we’ll cover everything you need to know—from basic ingredients and foolproof techniques to unexpected recipes you didn’t know you could make in your machine. We’ll also tackle important FAQs like: Is it cheaper to make bread at home? and Why did breadmakers lose their shine in modern kitchens?
Don’t miss our Savory Caprese Bread: The Ultimate Flavor-Packed Twist on a Classic if you’re looking to spice up your bread game.
Let’s get started!
Introduction to Bread Machine Recipes
What is a Bread Machine Recipe and Why Use One?
A bread machine recipe is specifically designed for the automatic process of bread baking in a bread maker. Unlike oven-baked bread, these recipes follow a set formula tailored to the device’s cycle of mixing, proofing, and baking.
Why use one?
Because it saves time, energy, and mess. Traditional bread-making can be rewarding, but it also requires hours of attention. With a bread machine, you can add your ingredients, press a button, and walk away—returning hours later to a warm loaf with a crisp crust and fluffy center.
Benefits of using a bread machine:
- Consistent results every time
- Less mess and fewer dishes
- Can be set to bake overnight
- Perfect for beginners
Some bread machines even offer delay timers and gluten-free settings, giving you more control over your results.
Discover great ideas like Ciabatta Bread Recipe – The Best Italian Homemade Bread Guide to try something delicious that pairs beautifully with soups and salads.
Essential Ingredients for a Perfect Bread Machine Recipe
The Core Ingredients Every Bread Machine Recipe Needs
To master any bread machine recipe, you first need to understand the building blocks of bread. While bread machines simplify the baking process, your choice and measurement of ingredients still play a massive role in achieving the perfect loaf.
Here’s a breakdown of the essential ingredients found in nearly every recipe:
| Ingredient | Purpose in Bread Machine Recipe |
|---|---|
| Flour | The structure; typically bread flour or all-purpose flour |
| Yeast | Helps the dough rise; active dry or bread machine yeast preferred |
| Water or Milk | Moisture content; impacts texture and softness |
| Sugar or Honey | Feeds the yeast, adds flavor and browning |
| Salt | Controls yeast activity and enhances flavor |
| Oil or Butter | Adds tenderness and extends shelf life |
🔸 Pro Tip: Always measure flour by spooning it into a measuring cup and leveling it off with a knife. Scooping can pack in too much and make the dough heavy.
The order matters: most machines recommend adding liquids first, then dry ingredients, and yeast last, especially if using a delay timer.
Learn more about Quick and Easy Bread Recipes for Every Home Baker to find starter-friendly ideas using these basics.
How to Choose the Best Flour, Yeast, and Add-ins for Bread Machines
Your choice of flour can make or break your bread machine recipe. Each flour behaves differently in terms of absorption, gluten development, and final texture.
Best Flours for Bread Machines:
- Bread Flour: Higher protein, more gluten, ideal for soft but structured loaves.
- All-Purpose Flour: Good for most recipes, but may need adjustments in hydration.
- Whole Wheat Flour: Denser; often blended with bread flour for better rise.
- Gluten-Free Flour: Requires special recipes and additional binders like xanthan gum.
Choosing the Right Yeast:
- Bread Machine Yeast: Specifically made for bread makers; quick-acting.
- Instant Yeast: Can be mixed directly with dry ingredients.
- Active Dry Yeast: Needs to be proofed in warm liquid unless the machine allows dry mix.
🔹 Important: Yeast is sensitive—too much salt or too hot water will kill it. Keep water below 110°F and add salt away from the yeast pile in the machine.
Add-ins to Elevate Flavor:
- Seeds & Nuts: Sunflower seeds, flax, walnuts (add at the beep or use nut dispenser)
- Dried Fruits: Raisins, cranberries, chopped dates
- Herbs & Spices: Garlic, rosemary, cinnamon, chili flakes
- Cheese: Shredded cheddar, feta, parmesan
💡 Many newer machines come with automatic dispensers for these extras—use them to prevent soggy add-ins.
How to Use a Bread Machine Like a Pro
Understanding Bread Machine Settings and Cycles
If you’ve ever looked at your bread machine’s control panel and felt overwhelmed—you’re not alone. But understanding how each setting works is crucial for executing any bread machine recipe successfully.
Here are the most common bread machine settings and what they actually do:
| Setting | Purpose |
|---|---|
| Basic/White | Standard for most white or light wheat bread |
| Whole Wheat | Adjusted rise time for denser whole grain flour |
| Gluten-Free | Modified kneading and baking for gluten-free flours |
| French | Produces a crisper crust and chewier crumb |
| Dough | Mixes and kneads dough only (for pizza, rolls, etc.) |
| Sweet | For breads with added sugar and fat; longer rise to prevent over-browning |
| Quick/Rapid | Faster bake time but usually denser texture |
| Jam | Yes—you can make fruit jam right in your machine |
| Bake Only | Use this to brown or finish baking underdone loaves |
Many machines also include crust color settings (light, medium, dark) and loaf size options. Make sure to select the appropriate one based on your recipe’s weight and flour volume.
🔸 Tip: Always read your machine’s manual. Some cycles include a “rest” phase before kneading begins. That’s perfectly normal.
Step-by-Step: How to Load Ingredients in Proper Order
The success of your bread machine recipe hinges not only on what you put in but how you put it in. Here’s the correct loading order for most machines:
Standard Ingredient Order (Unless Otherwise Stated by Manufacturer):
- Liquids first: Water, milk, eggs, oils
- Dry ingredients: Flour, sugar, salt, dry milk
- Yeast last: On top of the dry layer—never touching liquids
This setup keeps yeast dormant until the machine starts mixing. For recipes using a delay timer, keeping ingredients separate is essential to prevent premature fermentation.
🔹 Pro Tips for Loading:
- Scrape the sides of the pan after mixing starts (if your machine allows).
- Use a digital kitchen scale for flour and water for higher accuracy.
- For recipes with add-ins (nuts, fruit, cheese), add them when the machine beeps—or use the automatic dispenser.
Don’t miss our Cheese and Olive Quick Bread to try out a savory recipe that benefits from precise layering and ingredient timing.
Top Bread Machine Recipes You Must Try
If you’ve got the hang of your bread machine and nailed the ingredient layering, it’s time to roll up your sleeves and get baking. Here are some tried-and-true bread machine recipe favorites that deliver delicious results every single time.
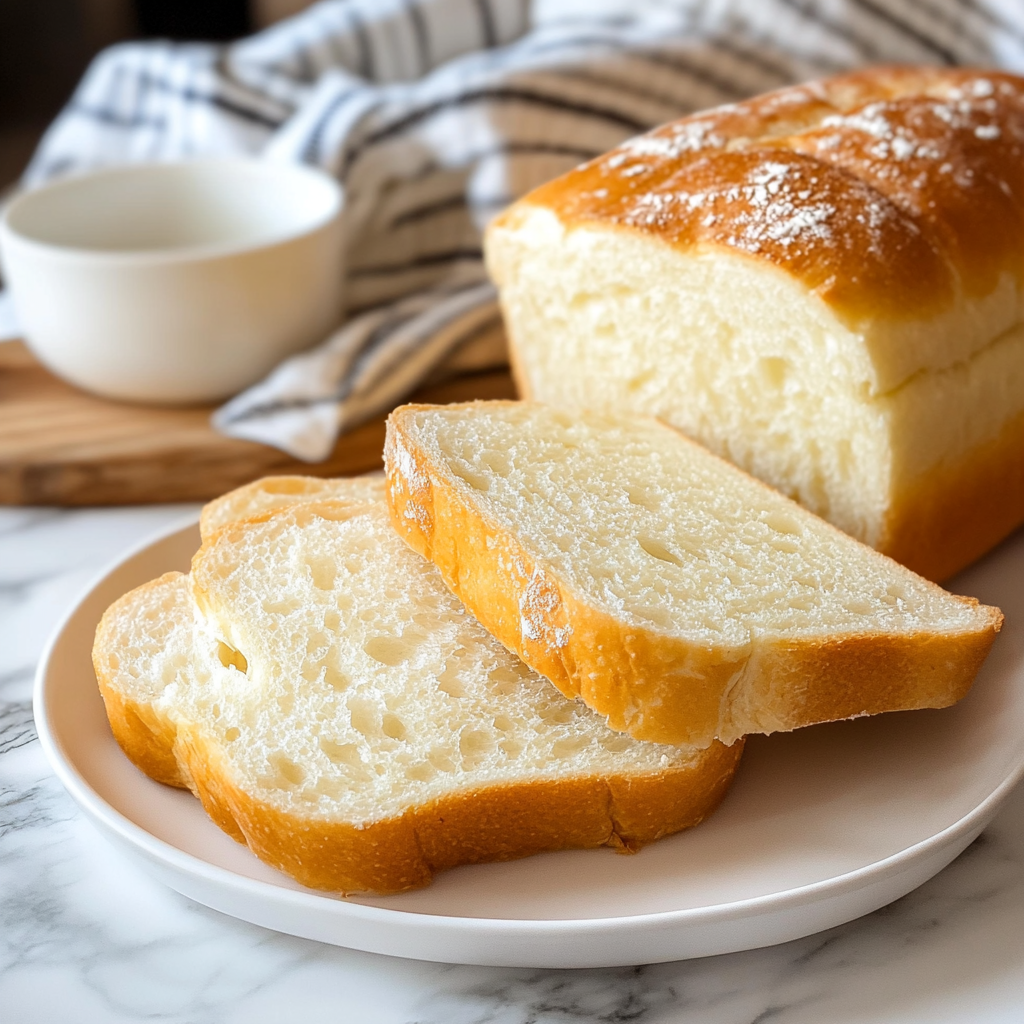
Classic White Bread Machine Recipe
This is the bread most people start with—and for good reason. It’s soft, slightly sweet, and perfect for toast, sandwiches, or just warm with butter.
Ingredients:
- 1 cup warm water
- 2 tbsp sugar
- 2 tbsp vegetable oil or butter
- 1 ½ tsp salt
- 3 cups bread flour
- 2 ¼ tsp bread machine yeast
Instructions:
- Add ingredients in the order listed (or per your machine’s instructions).
- Select Basic/White cycle and Medium Crust.
- Press start. Let the machine knead, rise, and bake.
- Once done, remove the loaf and let it cool on a wire rack.
This classic bread machine recipe is simple but never disappoints.
Whole Wheat, Sourdough, and Gluten-Free Variations
Once you’ve mastered the basics, you can explore other textures, flours, and flavors.
Whole Wheat Bread:
- Replace 1½ cups of white flour with whole wheat flour.
- Add 1 tbsp of honey or molasses for depth.
- Choose Whole Wheat cycle for best results.
Sourdough Bread (using starter):
- Add ½ cup of active sourdough starter to the mix.
- Reduce yeast by half.
- Choose Basic or French cycle depending on your machine.
Gluten-Free Bread:
- Use a commercial gluten-free flour blend.
- Add 1 tsp xanthan gum if not already included.
- Use the Gluten-Free setting, if available.
💡 Pro Tip: Gluten-free doughs are more batter-like and won’t form a typical dough ball. That’s normal.
Looking for inspiration? Try Fudgy Chewy Browkies (Brookies) as a sweet treat after baking your savory loaf.
Sweet Bread Machine Recipes to Try:
| Recipe | Highlight Ingredients | Cycle |
|---|---|---|
| Cinnamon Raisin | Brown sugar, cinnamon, raisins | Sweet |
| Banana Bread | Mashed bananas, walnuts, vanilla | Quick |
| Pumpkin Spice | Pumpkin purée, nutmeg, cloves | Quick or Cake |
| Chocolate Chip | Cocoa powder, chocolate chips | Sweet |
You’ll typically want to add these extras during the mix cycle beep or use the dispenser.
Creative Recipes Beyond Bread
When most people think of a bread machine recipe, they imagine a traditional loaf. But did you know your bread maker can do much more than just bake bread? From doughs to desserts and even jam, it’s surprisingly versatile. Let’s explore what else you can whip up with just a few button presses.
What Else Can You Make in a Bread Machine? (Jam, Pizza Dough, Cake)
Your bread machine is more than a loaf-making box—it’s a miniature kitchen assistant. With its built-in heating element and programmable cycles, you can easily create several types of recipes you may not expect.
1. Jam & Preserves
Yes, really. Many bread machines come with a jam setting that gently stirs and cooks fruit to the perfect consistency.
Simple Strawberry Jam Recipe:
- 2 cups fresh strawberries (chopped)
- 1 cup sugar
- 2 tbsp lemon juice
Add all ingredients, select “Jam” setting, and let it work. Pour into sterilized jars when done. No stovetop needed!
2. Pizza Dough
No more kneading by hand! Your bread machine can create smooth, elastic dough for pizza, calzones, breadsticks, and even pretzels.
Basic Pizza Dough:
- 1 cup warm water
- 2 ½ cups flour
- 1 tsp sugar
- 1 tsp salt
- 2 tbsp olive oil
- 2 tsp yeast
Choose the Dough cycle. Once done, roll it out, add toppings, and bake in the oven.
3. Cake or Quick Breads
Many machines include a “Cake” or “Quick Bread” setting. These allow for baking banana bread, pumpkin bread, and even boxed cake mix.
Pro Tip: Always scrape the sides during the initial mix to ensure all ingredients incorporate properly.
Unique Sweet and Savory Loaf Ideas
Now let’s break out of the basics and explore next-level creative bread machine recipes that’ll wow your family or guests.
Sweet & Unique:
- Chocolate Swirl Bread: Cocoa powder, sugar, chocolate chips
- Lemon Poppyseed Bread: Lemon zest, poppy seeds, yogurt
- Apple Cinnamon Bread: Applesauce, diced apples, cinnamon
Savory & Gourmet:
- Bacon Cheddar Bread: Cooked bacon bits, shredded cheddar
- Caramelized Onion Bread: Slow-cooked onions, a touch of thyme
- Beer Bread: Use beer instead of water for a deep, rich flavor
🧠 Experiment Tip: Swap water with coffee, milk, or flavored broth to change the bread’s entire character.
Why You Should Try Non-Bread Recipes
Using your machine for more than just bread:
- Saves kitchen time
- Reduces cleanup
- Offers better control over ingredients
- Unlocks new mealtime options
Many users report their bread machine becomes their go-to tool not for bread—but for dough prep, jam, and cake.
Check out Ciabatta Bread Recipe – The Best Italian Homemade Bread Guide to explore more artisanal takes that stretch your machine’s power.
Cost Comparison – Is Homemade Bread Cheaper?
With grocery prices steadily rising, it’s no surprise more families are exploring homemade alternatives. But is making your own bread machine recipe actually cheaper than grabbing a loaf at the store? Let’s break down the numbers and see what makes more “cents.”
Breaking Down the Cost of Store-Bought vs. Bread Machine Bread
To find out whether using a bread machine saves money, let’s compare a standard white bread recipe to a commercial store-bought loaf.
✅ Homemade Bread Machine Recipe Cost (Per Loaf):
| Ingredient | Cost Estimate |
|---|---|
| 3 cups bread flour | $0.60 |
| 1 cup water | Negligible |
| 2 tbsp sugar | $0.05 |
| 2 tbsp oil or butter | $0.20 |
| 1½ tsp salt | $0.01 |
| 2¼ tsp yeast | $0.15 |
| Total | ≈ $1.00 per loaf |
Now compare that to store prices:
🛒 Average Store-Bought Loaf Prices:
- Standard white bread (generic): $2.00–$3.00
- Organic or specialty bread: $4.00–$7.00+
👉 You save anywhere from $1–$6 per loaf, depending on the type of bread you’d normally buy.
But what about the initial investment?
🔧 Bread Machine Costs:
- Entry-level machines: $50–$75
- Mid-tier models: $100–$150
- Premium options: $200+
At just 1–2 loaves a week, the machine can pay for itself in under 3 months—faster if you bake regularly or make pizza dough, rolls, or specialty loaves.
Budget-Friendly Tips for Economical Bread Baking
To get the most out of every bread machine recipe and truly cut costs, follow these tips:
1. Buy Ingredients in Bulk
Purchase flour, yeast, sugar, and salt in large bags or containers. For example:
- 25 lb. of bread flour = ~$15
- Bulk yeast (1 lb.) = ~$5 and lasts months
2. Use Store Brands
Generic ingredients are often just as good for baking and save up to 30%.
3. Make Multi-Use Dough
Use one dough recipe to make:
- Sandwich bread
- Dinner rolls
- Breadsticks
- Flatbreads
You’re stretching a single mix into several meals or snacks.
4. Repurpose Stale Bread
Don’t toss out leftovers! Use them for:
- Homemade croutons
- French toast
- Bread pudding
- Bread crumbs
Don’t miss our Savory Caprese Bread: The Ultimate Flavor-Packed Twist on a Classic —a gourmet-style loaf at a fraction of the bakery price.
Is Homemade Bread Worth the Effort?
Let’s look at more than just dollars:
- Taste: Homemade bread is fresher, softer, and customizable.
- Health: You control ingredients—no preservatives or additives.
- Convenience: Bread machine = set it and forget it.
The more you use it, the more you save—financially and nutritionally.
Troubleshooting Common Bread Machine Problems
Even the most reliable bread machine recipe can go sideways from time to time. Maybe your loaf came out dense, caved in the middle, or had a crust that resembled rubber. Don’t worry—these issues are common and usually easy to fix. Let’s look at the most frequent problems and how to solve them like a seasoned home baker.
Why Your Bread Isn’t Rising – and How to Fix It
Nothing’s more disappointing than opening your bread machine to find a flat, under-risen loaf. Here’s what may be going wrong and how to correct it.
Common Causes of Bread Not Rising:
| Problem | Solution |
|---|---|
| Old yeast | Always use fresh, active yeast; store it in the fridge or freezer |
| Wrong water temperature | Keep water between 105°F–110°F to activate yeast without killing it |
| Salt touching yeast | Add salt away from yeast to avoid deactivating it early |
| Not enough kneading time | Make sure you’re using the correct cycle (e.g., basic vs. quick) |
| Too much sugar or fat | Excess can weigh down dough—follow recipe exactly |
🔸 Pro Tip: Open the lid after the first 10 minutes of kneading to check the dough consistency. It should form a soft, slightly tacky ball.
Avoiding Dense, Dry, or Uneven Loaves
Sometimes, your loaf bakes—but it’s heavy, dry, or oddly shaped. These issues often relate to the ingredient ratio or external conditions.
1. Loaf Too Dense
- Use bread flour instead of all-purpose to boost gluten.
- Make sure you’re measuring flour correctly—spoon into a cup and level, never scoop.
2. Crust Too Hard or Rubber-Like
- Check if your machine has crust settings. Choose “Light” for softer crusts.
- Adding butter or milk instead of water can help soften the crust.
3. Lopsided Loaves
- The kneading paddle may have shifted the dough. Pause and reposition before rising begins.
- Place the machine away from cold drafts or direct sunlight.
4. Over-Rising Then Collapsing
- Too much yeast or sugar causes over-proofing.
- Try reducing the amount or selecting a shorter cycle.
🧠 Advanced Tip: If your house is too cold or too hot, it can affect dough proofing. Maintain a stable room temperature or move the machine to a warmer, draft-free spot.
Learn more about Cheese and Olive Quick Bread: A Savory Delight You Can Make Fast—a dependable, balanced loaf that bakes well every time.
Maintenance and Care Tips for Consistent Results
To get the best results every time, your bread machine needs a little TLC:
- Clean the bread pan and kneading blade after every use
- Don’t submerge the pan or motor in water—wipe gently
- Remove crumbs from the heating chamber regularly
- Use distilled water if your tap water has high mineral content
Check out your machine’s manual for specific troubleshooting tips based on your brand.
Are Bread Machines Still Worth Buying in 2025?
Not long ago, bread machines were considered a fad—just another kitchen appliance gathering dust next to the juicer. But today, with rising grocery prices, growing interest in DIY cooking, and more advanced models on the market, the bread machine recipe renaissance is real. So, is investing in a bread maker still worth it in 2025?
Let’s find out.
Why Bread Makers Lost Popularity and Why They’re Coming Back
The Decline:
In the early 2000s, bread machines lost steam due to:
- The rise of artisanal bakery trends
- Limited countertop space in smaller kitchens
- Perception that they were “gimmicky”
- Inconsistent results from outdated machines
Plus, most people didn’t realize just how much versatility these machines offered beyond basic loaves.
The Comeback:
Fast forward to 2025, and we’re seeing a revival driven by:
- The DIY food movement on platforms like TikTok, Pinterest, and YouTube
- Improved technology (delayed timers, gluten-free, jam, cake settings)
- A desire for preservative-free bread with clean ingredients
- Rising bread prices in stores making machines cost-effective
- A shift toward home comfort cooking post-pandemic
Suddenly, what felt outdated is now practical, affordable, and even a little trendy.
Who Should Consider Buying a Bread Machine Today?
If you’re considering jumping into the bread machine recipe world, here’s who benefits most:
1. Busy Families
- Load, press start, and walk away.
- Fresh bread in 3 hours with no supervision.
2. Health-Conscious Eaters
- No preservatives, artificial flavors, or additives.
- Full control over sugar, salt, and flour type.
3. People with Dietary Restrictions
- Make gluten-free, low-carb, or dairy-free bread easily.
- Avoid cross-contamination from bakery products.
4. Budget-Conscious Households
- Save hundreds per year vs. store-bought artisan bread.
- Repurpose leftover ingredients into bread, dough, and cake.
5. New Bakers or DIY Enthusiasts
- Eliminate fear of kneading, proofing, or underbaking.
- Great intro to the world of baking without the learning curve.
🧠 Even professional bakers use machines for dough prep to save time!
How to Choose the Right Machine in 2025
If you’re ready to get started, here are features worth paying for:
| Feature | Why It Matters |
|---|---|
| Delay timer | Wake up to fresh bread in the morning |
| Crust settings | Control how soft or crispy your loaf gets |
| Gluten-free cycle | Essential for allergy-conscious bakers |
| Jam/dough/cake cycles | Boost machine value and flexibility |
| Auto dispensers | Add nuts, fruit, or chocolate at the right time automatically |
While entry-level models are great for basics, mid-range machines offer more value per use over time.
Check out Quick and Easy Bread Recipes for Every Home Baker to start experimenting once you have your machine in hand.
Print
The Best Bread Machine Recipe Guide for Homemade Bakers
- Total Time: 3 hours 10 minutes
- Yield: 1 loaf 1x
Description
Discover the ultimate guide to bread machine recipes—covering essentials, techniques, troubleshooting, and creative recipes for fresh, warm, and crusty bread at home.
Ingredients
- 3 cups bread flour
- 2 1/4 tsp bread machine yeast
- 1 cup warm water
- 2 tbsp sugar
- 2 tbsp oil or butter
- 1 1/2 tsp salt
- Optional add-ins: seeds, nuts, dried fruit, herbs, cheese
Instructions
- Add ingredients into the bread machine in the recommended order (liquids first, then dry ingredients, yeast last).
- Select the appropriate cycle (Basic, Whole Wheat, Gluten-Free, French, or Sweet).
- Press start and let the machine knead, rise, and bake.
- For add-ins like nuts, cheese, or dried fruit, add them at the beep or use the dispenser.
- Once baking is complete, remove the loaf and cool on a wire rack.
Notes
Use fresh yeast, measure flour accurately, and follow your machine’s manual for best results. Experiment with savory and sweet variations to expand beyond classic white bread.
- Prep Time: 10 minutes
- Cook Time: 3 hours
- Category: Baking
- Method: Bread Machine
- Cuisine: International
Keywords: bread machine recipes, homemade bread, easy bread, white bread, whole wheat, gluten free, baking guide
Storage, Freezing, and Reheating Tips
You’ve baked the perfect loaf using your favorite bread machine recipe—now what? To keep that homemade goodness fresh and flavorful for days (or even weeks), you need to store it properly. This final section covers best practices for storing, freezing, and reheating your bread machine creations without losing taste or texture.
How to Store Fresh Bread Machine Bread
Homemade bread is preservative-free, which means it won’t last as long as store-bought loaves. But with proper storage, it can still stay soft and delicious for up to 5 days.
Best Practices for Room Temperature Storage:
- Cool the bread completely before wrapping it. Warm bread traps moisture and leads to sogginess or mold.
- Use a bread box, beeswax wrap, or paper bag. Avoid airtight plastic, which encourages moisture buildup.
- Store in a cool, dry place away from sunlight or heat sources.
| Method | Shelf Life | Notes |
|---|---|---|
| Paper bag | 2–3 days | Keeps crust crisp, may dry faster |
| Bread box | 3–4 days | Good balance between softness & airflow |
| Plastic wrap + towel | 4–5 days | Soft interior, but can lead to soggy crust |
Avoid refrigerating bread—it dries it out faster than storing at room temperature.
Best Ways to Freeze and Thaw Bread Machine Loaves
Freezing is ideal if you want to make bread in bulk or preserve leftovers for later use. Fortunately, most bread machine recipes freeze exceptionally well.
How to Freeze:
- Let the bread cool completely.
- Slice the loaf first if you’ll want individual pieces.
- Wrap tightly in plastic wrap, then foil, or place in a freezer-safe bag.
- Label with the date and type of bread.
Frozen bread stays fresh for up to 3 months without significant quality loss.
How to Thaw:
- For whole loaves: Leave at room temperature for 3–4 hours.
- For slices: Toast directly from frozen or microwave for 15–30 seconds wrapped in a paper towel.
Looking for inspiration? Try Fudgy Chewy Browkies (Brookies) for a sweet complement to your thawed slice of cinnamon or banana bread.
Reheating Without Drying Out the Loaf
When reheating bread, the goal is to restore the warmth and softness without drying it out.
Methods That Work:
- Oven: Wrap in foil, bake at 300°F for 10–15 minutes.
- Toaster oven: For crusty slices, toast for 3–5 minutes.
- Microwave: Wrap in a damp paper towel, heat for 15 seconds.
🧠 Quick Tip: For crusty breads like ciabatta, lightly spritz the outside with water before baking to revive the crust.
When Not to Reheat:
- Don’t reheat repeatedly—only warm what you plan to eat.
- Avoid microwaving uncovered slices—they dry out fast.
Learn more about Ciabatta Bread Recipe – The Best Italian Homemade Bread Guide for artisan loaves that reheat beautifully.
Frequently Asked Questions: Bread Machine Recipe FAQ
What ingredients do you need for a bread machine?
At its core, any good bread machine recipe requires just a few basic ingredients:
- Flour (usually bread flour for best results)
- Yeast (bread machine or instant yeast)
- Warm liquid (water or milk)
- Sugar or honey
- Salt
- Fat (butter or oil)
Depending on the recipe, you can also add eggs, milk powder, dried fruits, nuts, seeds, cheese, herbs, and more.
Why are breadmakers no longer popular?
Breadmakers fell out of fashion in the early 2000s for a few reasons:
- Many found them bulky and space-consuming
- Early models were inconsistent and noisy
- Store-bought bread became more accessible and cheaper
But in recent years, they’ve made a big comeback due to:
- Rising food costs
- Interest in homemade and preservative-free foods
- Improved technology and compact models
- Social media trends promoting DIY baking
What can I make in my bread machine?
More than just bread! Your bread machine can handle:
- Pizza dough
- Cinnamon rolls
- Jam and fruit preserves
- Cake and quick breads
- Artisan-style loaves
- Gluten-free recipes
Some even make yogurt, pasta dough, and soft pretzels with custom cycles.
Is it cheaper to make your own bread with a machine?
Yes. On average, a basic loaf costs around $1 in ingredients, compared to $2–$5 for store-bought bread. Making 2 loaves per week saves you over $150 per year. The more you bake—especially specialty or gluten-free bread—the more you save.
Your machine can pay for itself in under 3 months if used regularly.
Conclusion: Start Baking Smarter with Bread Machine Recipes
If you’ve ever hesitated to try your first bread machine recipe, now is the time. These modern kitchen tools offer unmatched convenience, cost savings, and quality—all wrapped into one sleek appliance.
Whether you’re a beginner looking for foolproof loaves or a seasoned home baker experimenting with jams and sourdough, a bread machine can simplify your life and fill your home with the irresistible smell of freshly baked bread.
Don’t miss our Savory Caprese Bread or Quick and Easy Bread Recipes to jumpstart your bread machine journey today.
For daily recipes you can follow me on Facebook and Pinterest.